Sunday, October 27, 2019

Come Out and Play


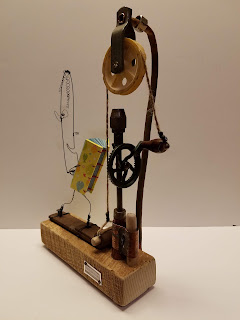
In a long ago post I mentioned a piece that had some technical issues which needed to be addressed.  Using a shelf mocker box with corresponding mocking ceramic head and arms, I worked this piece until the stumbling block of how to attach the hands to the wire mechanical movement came into play.  And there it sat...for months.  I knew I had to get past the blue painters tape, the arms were falling off by this point.  Having tried to drill a tiny hole through the arm, nope, then simply wrapping wire around the arm, again nope, it was time to try 2 part epoxy.  I felt this was the last resort because if I mess up the mixing process or attach the hands in the wrong position, or as in the past, have the piece shift while drying becoming non functional, having only one set of hands kept me from moving forward.  As you can see I had some reservations.  As it often happens, the piece spoke and I heard the lady in the box whisperer that it was time, she was ready to come out and play.  I dug the epoxy out of the bottom of my stash and made my plan.  The wire to attach the arms were sticking out of the appointed holes ready to be cut to length, the first commitment to make me sweat, next was filling, but not over filling the minute hole in the arm, and lastly finding a way to have the epoxy set in the correct position while hanging in open space, really sweating now.  Each step attended to, now to wait.  


With a large bit of trepidation I removed the stabilizers and gently spun the handle.  The arms stayed in place and they move as envisioned.  Whooo!  She is just the perfect mix of whimsy and weird.  Her arms swivel in and out with a bit of up and down making it gloriously creepy.   The arms "click" against the wood adding another layer of depth to the piece.   I hate that I waited so long to man up and use the epoxy.  I still think I will always sweat a bit when I use it though.

Yesterday was the wedding of my Godchild and his lovely wife.  The love shared was a great reminder to hold hands with the ones you love. This marks the beginning of our busy season sharing time with family and friends.  Hugging grandbabies, soccer games,  Arrowmont, holidays, I even entered us in a 1 day craft fair just to keep us on our toes.  The new year will be here before we know it.  Enjoy all that is brought your way.

Time for Sunday brunch and the news paper... yep, we are old school.

Peace,
Hilari


Saturday, September 7, 2019

Things, They Are A Changin'


Having been an only child in our work shop, it has been quite the shock having to share the space with Husband recently.  He has found his voice in the art world with acrylic pouring.  The Saturday after my lengthy trip to Arrowmont I decided to skip my KBAG meeting, which I rarely do.   First, I was tired and second,  Mrs. Scharon was teaching the fundamentals of acrylic pouring and my body can no longer tolerate being around paint fumes of any kind.  Sometimes this is a blessing...Sorry, Dear, I can't help paint the living room...but mostly it keeps me very vigilant when I am creating with anything that generates an off gas: torching, painting, gluing, etc..  I have had to change course many times to complete a project due to this, but I digress.  In passing I let Husband know my plans, or lack of, and he said that he was interested in going.  Wow, ok.  I introduced pouring to him via YouTube a few weeks prior but had no idea that it piqued his interest.  So off we went and he has been going strong ever since.  He has even taken a one on one class with Mrs. Scharon so he could learn more.  He now has a nice stash of paints, pouring medium and canvases.  He is the first to look at the art store fliers in the Sunday paper.  He is making some beautiful and interesting work and I am always excited for the end result.  Since I cannot be in the shop while he is working I get to be surprised by what colors were chosen and how they mingled together.


Lately I have been working with copper and patina.  The cutting and manipulation of the metal is very satisfying but carefully opening up the ammonia container and being surprised with the outcome is where the joy comes in.  Much like with Husband's pours, I never know what that will be...very blue, some blue with copper accents or just dark and bland.  The blues are organic and beautiful, the dark and bland not so much, but they can be cleaned and reintroduced to the ammonia with hopefully a better result.


Next I would like to learn how to enamel on copper.  Arrowmont offers classes on this and I would love to participate but having had a reaction to a room full of people using torches, I know it is not possible.  Thank goodness for YouTube because I can see the process and go at my own pace.  Now I just have to pull the trigger and buy supplies for another project.  Maybe if I call it an addition to this metalworking project I can justify it.  

I must be off to put on my orange and gather my crochet so I can be ready root for my hometown college team.  Last week's loss was hard to watch but we have high hopes for this game.  Happy Saturday!

Hilari


Sunday, September 1, 2019

A Circut Tent and A Car Rotor


Arrowmont 2019 class blog 2:

With an idea of the class direction expected, I made a prototype of a circus tent out of a box and wire using a door peep hole to peek through.  I knew with this in hand I would be better able to explain my vison.  I tolled the week prior, having the piece ready and in working order with a couple of days to spare.  With my new 3 tiered, wheeled tool bag ( thanks Husband!!!) loaded to the brim and packed in the car, off we went, sadly leaving my project idea behind.  It is very difficult to explain to someone not introduced to my work what my intentions are:  I am going to make a circus tent, which when a crank is turned a juggler and 2 acrobats will move independently of each other inside said tent.  All of this is seen through the lens of a door peep hole attached to the wire ceiling.  Yep, I got the usual blank stare as this was being processed.  I told the teacher that I had made one and it would work. He did not look so sure.

I carved the tent, added the wire and proceeded to rust the piece. While this was going on I tinted some muslin a light red and blue for the tent top. I worked this fabric to death trying to get the shape to convey what I wanted.  It fought me at every turn.  Come to find out it was not the fabric, it was the wrong choice of color.  Digging in my stash I found this orange and gold stripe and all fell into place.  I did have to wear down the brightness and nap by using sandpaper, adding its own kind of rusty feel.


An after the fact addition was a set of tiny lights that circle the perimeter base inside the tent.  It gives off a warm glow and really sets off the performers as they dazzle the crowd.  The star is the lady in the ring who comes dangerously close to the razor blade as she swings about many gasps are heard during her death defying feat.

Out teacher had been asking around if there was any place to find free junk in the area.  He was directed to an abandoned shed close by and off he and some of the classmates went to gather.  One of the cool pieces shared was a 4 inch prism.  I quickly discarded the door peep hole idea and put the prism in its place.  Wow, it could not be more perfect., giving the viewer a dreamy look into the tent.


Mr. Gorman feels that the base of the piece is very important to the overall feel and that we should take this into consideration while constructing the parts.  I was very lucky to be going home between the 2 week class because I was able to fish around in my stash.  I unearthed a car rotor that was the perfect size and could hide the battery pack for the lights.  With the addition of a lazy Susan mechanism (Husband's idea) it all came together.  I added a balloon holding, unicycle rider to the back so there would be a point of interest while the piece was being turned.


All in all it came out very close to the original idea but with many improvements. I have another piece for another post.  Two weeks is a wonderful amount of time to create.

A recent weekend was spent in the warm comfort of family.  Our annual reunion lost some of its steam when our matriarch, Aunt Margaret, passed away a few years ago.  She was the driving force behind our gatherings.  This year we shared laughs and love at her homestead, which has been wonderfully restored by her son and his wife.  It was so special to be back sharing old memories and making new ones with the new generations coming along.  Cousin has next year and Husband and I are on the list to host the year after.  Sounds like we are back on track.

Wishing all a happy Sunday!
Hilari


Sunday, August 11, 2019

Taxidermy Foam and a Lesson


Another trip to Arrowmont School of Arts and Crafts has left my mind moving in all directions.  The class was called Finding the Souls of Forgotten Things and was taught by Geoffery Gorman.  I was first introduced to his work in 2011 when he was featured in the magazine American Craft.  I was so enthralled that I cut out the article pictures and glued them into my Ideas and Really Cool Stuff book, with his artwork falling into the really cool category since I knew that there was no way I was going to get the opportunity to learn how he made his pieces.  As I perused this year's catalog I was immediately stopped by a picture of Mr. Gorman's work, with him teaching the class. Weeee!!... wait, it was a two week class.  Hum, how was I going to swing this?  Once again, I am blessed to have a husband who knows how important these classes are to me.  With his and Mother-in-law's (room and transportation) generosity I was able to enjoy another art filled time.

Classes start Sunday evening, usually with a quick introduction of class members and an overview of what is to be taught.  This allows us to be off and running on Monday morning.  This technique starts out with carving taxidermy foam into the desired shape.  Mr. Gorman's focus is animal shapes but we were free to choose our path.  Having never done carving previously, my first rabbit attempt looked like a very small dinosaur head.  It just kept getting worse the more I tried to fix it.  It finally somewhat resembled a piglet.  My second attempt was a success.  Next you cover the foam, wrap in wire, add adornments, then rust.  The 2 yellow beads, which I used in the eyes along with bottle caps and shinny black beads, just fell of my tool box when I was searching for something else. One of those serendipitous moments. The nose and ears were cut from a metal cigar box. To give Mr. Rabbit some life, I added a crank movement to a thrift store box so the head will bob and spin around.


The bat was my first project attempted.  I have been watching (almost addicted to) YouTube videos of rescued and rehabilitated fruit bats in Australia.  They are adorable.  These bats are not like the bats we are accustomed to here so I had to introduce the teacher to them so he could see where I was heading with my project.   His wing span is 16 inches with a body height of 14 inches including his legs.  I had hoped to have movement in his wings but it has not happen as of yet.  This is not from the lack of trying and I have the pulley positioned on the wooden stand for this reason.  It will happen at some point, he will let me know when he is ready.  I started with this because the shapes were not complicated and I could get the technique figured out.  It still took some time to get the body as I wanted, it was huge and needed to be correctly shaped but once that was done I knew what size to make the head.


He really came to life with the addition of the ears.  Both the ears and the nose are made from used bike inner tubes. I wish the shinny beads had been available for his eyes like with the rabbit. This is something I can do at a later date.  I love the depth they add to the face.

There are 2 more projects that were completed during class that I will share next time.  Well, one completed and one I would like to add more wire to and rust again.


Our family has grown in the last three weeks with the addition of out first grandson.  He had to be in the NICU for 5 days which was unnerving (apparently it is not as uncommon as one would think), but he is doing well.  Daughter-in-law has to go dairy free while she breastfeeds so she may be out of sorts for a while, she loves cheese.  We are hoping he will outgrow the problem.

So life has been a whirl wind: 2 week art class, busy work week playing catch up, grandson coming into the world, 3 trips to his hometown while in hospital(1.5 hrs away), another busy week playing catch up and now I have a cold. Husband has been taking good care of me making sure I am hydrated and fed.  Next weekend is a family reunion in North Georgia and the next is a visit to the grand kids, both of which I am excited about.  I am glad to have the cold now to get it out of the way.  That's how it works, isn't it?

Wishing you a peaceful Sunday!
Hilari


#arrowmont #craftexperience


Sunday, June 9, 2019

A Pop Of Yellow


This all started with a trip to the beach and a thrift store (you know how I love thrift stores).  Even with all my art supplies and ideas waiting in the hotel room, I could not help picking up a smallish, silver plated tray with a cutout decorative edge.  And per usual, a book that I could disassemble, if the need arose. Our day of sightseeing having come to an end, I settled in to play with my new finds.  Having no clear plan, which is highly irregular for me, I ripped and attached paper using wire through the edge cutouts.  I knew from the beginning that it was not working, but with no mental direction I kept trudging down this unfulfilling path.  I kept right on until I had that whole tray filled with hand ripped paper.  Knowing it was a hot mess I showed it to BFF, hoping for a different perspective and maybe an "Oh Wow, That looks great!!"...no, she squinched her nose and said "Hum"...more of the reaction I was expecting. After the two days of manhandling this downtrodden piece I chucked it in my art bag and moved on to a project that was more to my liking.  This was the state it sat in for a year and a half.  Another shelf mocker.  As with the others mockers, I would pick it up now and again and move it around hoping for inspiration.  Not much hope for this one.


One afternoon I heard the forlorn piece calling that it was ready to come out and play.  Ok...lets see where you want to go.  The first thing was to lessen the amount of paper I had crammed onto the platter, so I removed an inch thickness from both the front and back letting the rest of the paper fall into place with a more open feel. Next I addressed the top of the pages by cutting them into a softer shape and highlighting them with blue chalk, taking away the previous rough square design.  That is when the piece shouted its plan and off we went.  Of course it needed to have some movement like the other completed shelf mockers.  I knew what I wanted to happen...to have both the ship and the crescent moon rock left and right independently at their own pace. To add more mental thought, they needed to be off center of each other so they were not in a straight line...boat in the middle as the central point and the moon off to the side to fill the visual space on the right.  A wire mechanism needed to somehow attach to the underside of the metal platter filled with paper, not your normal way to make automata.  

A bit of Devine intervention came into play with already having a stand that fit the platter perfectly.  Why I had this and where it came from I do not know, but I have been shifting it around the workshop for a few years.  The height gave me the starting point for making the mechanics.  As I said in the last post, all the parts are dependent on each other and where you start affects going forward.  So with my first parameter set I grabbed the drill and committed to to the placement the boat and the moon.  Ok, good, now how to get them to do what I want.  This is when time stopped.  An afternoon spent manipulating wire...boat sailing properly but moon going in circles, tweak, boat now sailing front to back, moon still going in circles, tweak,  moon good boat stuck, tweak… again all parts interdependent... but finally boat sailing pretty smoothly and moon cresting over the waves as desired.  All attached and moving but there was a dead space on the left side, no movement or color so I added the bright yellow star that swings freely.  This is exactly the pop it needed to finish it off.


With our proximity to the Smoky Mountains, our area is known for our lightening bugs, or fireflies, if you prefer.  Last fall Husband was thrilled when I brought home a 2 person metal swing in need of a home from a neighbor (something else to mow around) but I knew it would be wonderful for this, and it is.  For a short span of time, around 3 weeks, I love to spend the twilight watching these bursts of yellow pop and zip aroundAfter seeing some of the stunning professional pictures other have captured of the twinkling masses, I set off to see what I could do.  I mostly looked like a lunatic skittering around the front yard with cellphone in hand.  These little guys are apparently a bit camera shy and zoom away quite quickly when you set your sights on one or they stop blinking altogether if found resting on a blade of grass.  After many failed attempts, I captured one in mid blink and with that my job was complete.

Mr. Squirrel is sitting on the front window ledge staring in, letting me know his bird feeder is empty.  Sometimes he will share his bounty with the birds and a family of chipmunks but usually it is just he and his squirrel buddies feuding over who will gorge next.

Off to feed the masses.
Peace,
Hilari

[I have attempted to correct the weird font change and highlight to no avail.]


Sunday, May 5, 2019

Wackadoodle


As I said before, this year is about creating for the sake of creating...what that actually means is that I am pulling out half done projects and trying to interject some life into them...and getting the pieces off the work bench and shelves.  So far I have been pretty successful with the ones attempted.  Due to time passed and new revelations as to how to proceed or simply forgetting how the outcome was supposed to be, I have attended to a couple of these hanging chads, the above piece being one of them.


The caricature design loosely came from a Christmas card, which when translated with wire became his own identity.  I made the book long and thin to match the shape of the head, covering it with fun balloon paper from my stash.  And that is the state in which it sat for months.  Some days I would pick it up and wiggle it around to see if an idea for future progress would pop into my head, but alas, it was always replaced on the shelf, waiting.  Along side it sat a sturdy hinge piece with 2 holes ready for future attachments found during one of my wanderings.


On a day when the wind was blowing ideas around just right, I gathered the book reader and the hinge and started digging around in my stash. I enjoy working with the hand drills because I like the look of the mechanism and the movement is already created for me.  My brain worked out the connection of the pieces and with a trial run I had great expectations.   I tightened a dowel into the top of the hand drill and one through the hinge, connected with rope, with the intention of a simple up and down movement of the hinge.  Nope (I should be used to this by now), once again wrong mechanics.  The rope twisted around the drill shaft when the crank was turned.  Well, yeah, of course.  It is always so simple to see after the fact.  By this time I had already carved the hole for the handle and attached it to the base with  a dowel and a piece of copper.  There was no going back.


Ok...up and down ...up and down... I have a tendency to hold the problem piece and give the motion I want until I either figure it out or put it back on the shelf...this has taken hours in some cases. Thanks to a yard sale can filled with odds and ends...I have a hard time passing these up due to what treasures might be contained within...I had a yellowed, plastic wheel with a handle attached.  Score!   This would give me the up and down when the drill handle was cranked.  Now I had to figure out attachment of the wheel.  I had some copper tubing that I flattened one end and screwed to the back of the base at the height I needed to have the wheel float over the top of the bit holder. With a bit of finagling, I was able to get just the right amount of hinge rise to correspond with the circular movement of the handle.  When the handle is turned the reader pops up and down in a joyously  erratic way.  Hence the name Wackadoodle.

Today had the opportunity to be a full day, but with decisions made, it is going to be a day of rest.  It is ok to be the piece on the shelf, just sitting quietly.

May your day be full of peace,
Hilari


Sunday, March 10, 2019

A Thrift Store Box


There are times when you purchase an item, or 2, that you have no idea what you are going to do with, but it, or they, are just too good to pass up.  They are placed into a drawer, forgotten, or even worse, they sit on the shelf in plain sight mocking you.  The box mocked while the ceramic head lay in wait.  In truth, 3 boxes mocked and 4 heads chatted together while exiled.  All were thrift store finds so that makes it better, right?


 When making a piece like this I have to think 3 steps ahead to make sure I do not attach a part to soon.  The time turner, disassembled from a travel Boggle game, is a stand alone mechanism. (I thought it was unusable but in actuality I had not fully released it from the plastic holder. In a panic, I now have a 4 pack coming from the Netherlands to sit on a shelf and mock) It is created and attached with no other pieces affected by its placement.  The book on the other hand is interwoven to the moving parts as well as the placement of the head.  The head also determines where to place the peep hole for her face, which has to be cut before all is connected.  When the handle is turned the book opens and closes a bit.  This "bit" is gauged by the depth of the box.  I have to figure out, usually by thinking backwards, where to start.  In this case I had to start with the head, moving to the size of the book, which told me where to attach the wire mechanism.  After all the thinking and attaching, it did not work.  The string, which is connected to the book covers, kept wrapping itself around the wire and aggressively jamming the book to the box.  Not what I was going for.  It took a while, sitting in silence, wrapping and unwrapping, again and again, because, as we all know, if you keep doing the exact same thing over and over you will figure out the answer.  Well, in this case it worked .  It was a tension thing.  Once the book was held tightly by the string there was no slack to wrap.  And now the music can be turned back on.

In a song by the group System of A Down they sing "Between the sacred silence and sleep".  I love this time, not awake or asleep, because I this is where my creativity flows.  Somehow I can see the patterns moving throughout my pieces, the connections become clear, ideas become sharper.  I am not granted this enlightenment every night but I use it to the fullest extent when I am aware enough through the sleepy haze.  And then there are those times that the most brilliant ideas fade away into dreams.

The rain has stopped and the sun is out so it might a day to see parts of the world other than my workshop.  I really love being in my workshop...maybe I will just open the window and let the world come to me.

Peace,
Hilari


Friday, January 11, 2019

My Bucket List and A Destination


Last year was a destination, not a journey.  I was creating for sale, which is creative, just not for creative's sake.  Let me preface this by saying that my mother and I are not travelers.  We did not inherit my maternal grandmother's want to travel the world, she said she would be the first to sign up to go into outer space.  When I told Mother her birthday/ Christmas present was that we were going on a bus tour to New York City (the destination) I could hear the wheels turning: New York?...why?, I have to pack, leave the comfort of home, be around a bunch of people, etc.  I knew what she was thinking because I felt the same way when the idea popped into my head, but seeing NYC at Christmas time (or anytime) was on my bucket list, I was working towards it and we were going.  I got through it and I knew she would as well.  And what a delightful time we had.  We had lunch in Grand Central Station, walked in Central Park, visited Harlem, Chinatown, and Little Italy, Times Square, rode the Staten Island Ferry and saw a very cloudy Statue of Liberty, Rockefeller Christmas tree, and many other wonderful touristy things.  The trip was much more than I had hoped and I am so blessed to have been able to share it with her.


This is one of my favorite pictures of the trip.  Our day had been full of sights and sounds and after dinner we had the option to return to and immerse ourselves in Times Square or stay on the bus in the piece and quiet.  Each relieved that the other did not want to go, Mother and I, along with a few others, enjoyed the tranquility offered.  As we sat on a side road biding our time I watched the interactions of a barber and his customers.  There was conversation and camaraderie,  distance leaving me only to guess the topic at hand.  I like how the rain drops distort the image, adding to the inability to know exactly what was transpiring.  

I am feeling a bit lost with what to do with myself after the push towards the trip and making holiday gifts.  I am quite sure I will not feel this way for long. Something wonderful will catch my attention and I will be off and running.  The destination was very special, so now is the time to enjoy the journey.

Peace,
Hilari